


Hey there! I'm Zoe and I blog over at Etsy Addict. I'd like to give a big thank you to Someday Crafts for letting me guest post! I'll be showing you how to make this Chain 'n' Bead Bracelet. I'm from a metric country so I have included measurements in centimetres and inches.

This easy bracelet can be whipped up in under an hour, requires supplies available at any craft store and is great wrist candy. For this bracelet you will need:
- 1m (39") 2mm Satin Rats Tail Cord, like this.
- 30cm (11 4/5") Stretchy 1mm thin Cord, like this.
- Seed Beads
- 30cm (11 4/5") Chain
- 2 10mm Ribbon Clamps, like this.
- 2 Jump rings (1 small, 1 large)
- 1 Lobster Clasp

First off, cut 3 pieces of rats tail cord about 23cm (9") long. This is should be sufficient for the average wrist. Cut your chain into 23cm (9") long piece. Cut a 26cm (10 1/5") piece of your stretchy cord.

Tie a knot at one end your stretchy cord, leaving about 1cm (1/2") cord before the knot. Thread your seed beads on. Tie a knot at the end when the beads are on, leaving 1cm (1/2") after the knot.

Lay your rats tail cord, beaded cord and chain out like so. One piece of rats tail cord will go with the chain, one by itself in the middle and one goes with the beaded cord.

Pinch everything together with your finger and thumb like so.

Get one ribbon clamp and put it over all the pieces, making sure everything is encased in the crimp and squish it flat with pliers.

Lay your bracelet so far out like below and plait it like you would your hair.

When you have plaited the bracelet, get your other ribbon crimp and do the same as you did before. Make sure you don't twist your bracelet around when doing this!

Get your smaller jump ring and thread the lobster clasp onto it. Then thread the jump ring through the hole on one of the ribbon crimps.

Thread your large jump ring through the hole on the ribbon crimp at the other end of the bracelet.

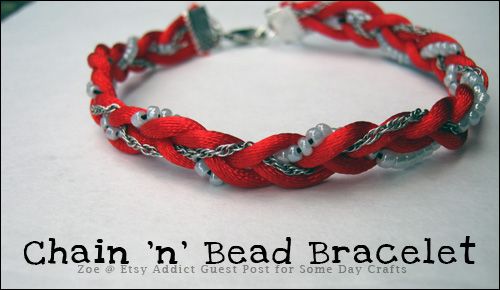
Your bracelet is done!


If you have any questions about how to make the bracelet or the supplies needed, please comment :)


I really love your work its easy to make. Keep sharing more.
ReplyDeleteBead bracelets