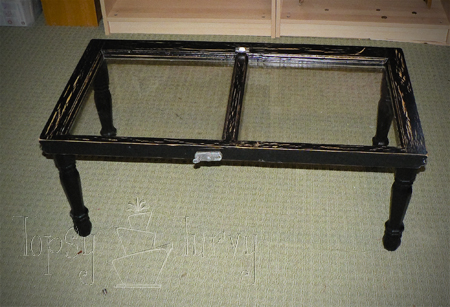
I am SO excited to be here guest blogging on Someday Crafts! I've enjoy checking out Michelle's blog every day. She's always on top of new and unique crafts! I was surprised and honored when she mentioned doing a guest post! My husband thinks I'm a bit silly for being surprised (he thinks everything I do is amazing, he's sweet) but I am still shocked every time someone checks out my blog! It's just so much fun!

My name is Ashlee and I have a little blog called

I've been blogging since 2007 for my family and my cakes, but I'm new this year to the world of blogging my crafts! With 4 young children, my crafting has taken a back seat the last few years. THEN this last year my husband lost his job, my children were diagnosed with aspergers and we moved into my in-law's basement. It's been an unexpected, crazy, stressful year and I found that getting back into crafting has been a huge relief and escape for me. I actually started 101 goals in 1001 days this year and it's been just SO much fun for me (and I get so much more done!)
On my blog you'll find tutorials, holiday crafts, home and family crafts, crocheting, parties, etc.. I bit of everything. I can't narrow down my interest. I'd get too bored! I tend to get REALLY into a certain medium (cross stitching, crocheting, painting, sewing, etc...) for a few months then drop it and move on to the next thing. Always coming back again!

On the other side of my interests and blogging are the food and cakes! I have recipes, meals, cakes, tips and tricks! I LOVE cooking and baking. I started cooking from scratch when we lived in Japan and I HAD to! And I fell in love with cooking from scratch. Then I got into cakes, with 4 kids I have lots of birthday parties to throw!

After expanding to making cakes for extended family and friends I decided to start a cake business on the side(Mom is still my full time job). But because we've moved so much (10 times in 9 years) I've just worked by word of mouth... Until now! We're finally staying put in one area and so now I have a real web site. I get to start marketing and hopefully help support my family a bit. I just got it and am working on the launch. Hopefully in the next month it will be ready to go (and then I'll do a giveaway here on Someday Crafts for all Local's in the Salt Lake area!)

And since I can't stick with just one thing I also started an Etsy store. I know, crazy, right? But this way I get to keep crafting (better than therapy) but don't have to find places for all of it in my small basement apartment! I have my continuous zipper purse and other zipper crafts, silhouette jewelry and canvas's, beaded baby/toddler socks, personalized hair barrettes and Pettiskirts. Coming soon? Hair band's from my baby sister!

Everything is made to custom order, I don't keep anything on hand, so it does take a bit longer to get to you, but it's exactaly what you want! You can custom order colors, patterns, sizes, personalized, etc... And if you see something on my blog that,s not in my store that you'd like just let me know. I'm happy to create something for you!

So that's the "short" version of me! On to the main event, the actual craft!This craft is actually how I met Michelle. She mentioned on her blog that she as selling some old windows from the house they are remodeling and she would be in Salt Lake. I didn't have anything in mind, but knew that getting some old windows was just too good to pass up. So met up with her over spring break and picked up 4 of the windows she had available.
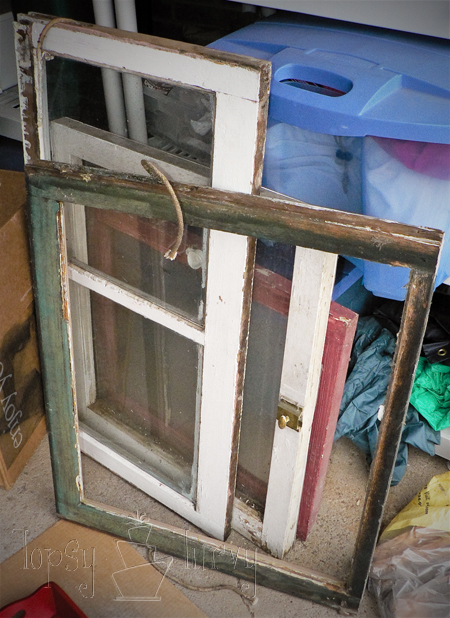
Then it hit me... A table for my family room! So I picked out the longest, double paned, window and got to work! If you find a window that you love JUST THE WAY IT IS than this will be much easier for you than it ended up being for me. The plan was to leave it, but then my husband got all worried about lead paint. And he had a very good point. Our kids tend to bite things. Our pet pig chews on things and, well, it's just not the best idea to have lots of lead paint around. SO I decided to clean it up and repaint it.
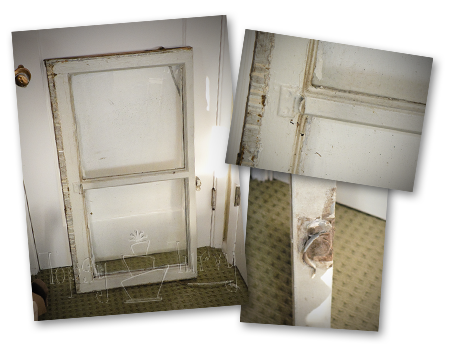
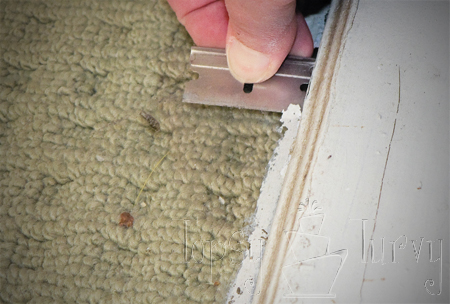
I started by cleaning up the glass, I like to use a razor blade. You can clean anything off glass with a good sharp razor blade. It's better than windex. And it's pretty quick and easy.
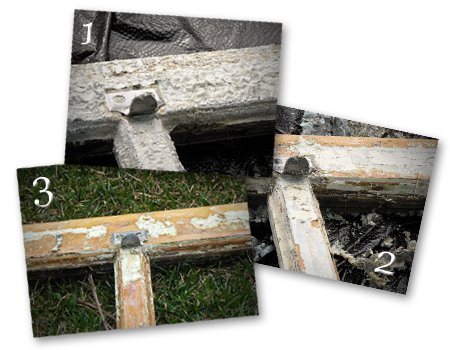
Then I decided to clean up the painted over hardware. I didn't want it too look brand new, but wanted to get the paint off. I started with some gritty sandpaper (1), but quickly moved to my handy dremel (2)! I love this tool, and use it more than I expected to when my husband gave it to me for Christmas 2 years ago!. After using a heavy duty sanding head I moved down to the smoother sanding head. You can see that it didn't make it look new, it still looks worn and old, but at least no paint or rust on it anymore (3).

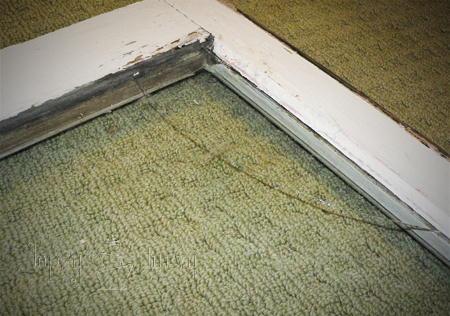
This is where things went from an easy craft to a difficult one. When I was vacuuming up after sanding down the hardware I noticed that the glass had a HUGE crack in it. I guess better that the old, weak glass broke before I finished, but it did add a new dimension to the project. Now that it's over, I have to say I'm glad it broke. I decided to take out both glass panes and replace it with thicker, stronger Plexi-glass. Now when my kids climb on the table (which you know they will) I won't have to worry (as much). Since it would make this post WAY too long, check out how I replaced the glass with plastic sheeting on my blog HERE!
I didn't want to sand off all the layers of paint (I think there were at LEAST 6 layers of paint), not only because of the lead paint dust, but because I would go through WAY too many sanding belts. So I stripped it. If you've ever stripped something, let me tell you it's kind of fun! You paint it on, and let it sit until it blisters (1), then scrape it off (1) and if it needs it (Because the paint was so thick) strip it again (3).
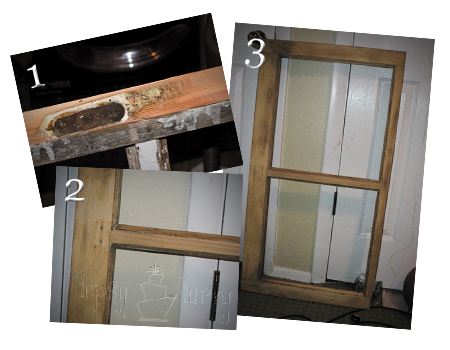
I decided to take off the hardware (1) so I could sand the remaining paint down without the hardware getting in the way or getting damaged (2). Look how pretty (3)! I sanded the top and the sides, but I didn't bother stripping or sanding the underside. This is the point where my husband said I should have just made my own window! Silly man, it's still an old window and very well made at that.
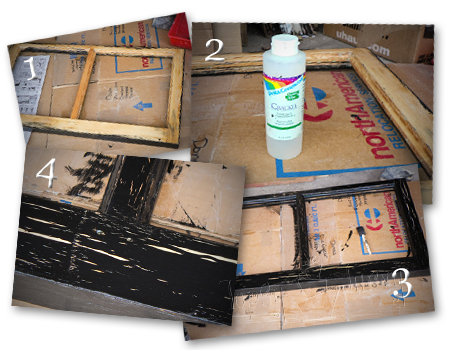
Next comes the fun, the PAINT! I started by sealing the wood with a polyacrylic. I knew that as I aged the paint and window, the underneath area would show through and I needed it to be treated correctly. Then I painted the bottom and sides with my acrylic black wood/metal paint (1). I went with black. It's simply my favorite color, and also because I found some black Behr paint in the messed up paint section at the hardware store for $5! Then I got out my crackle paint (2). This stuff is over 4 years old and still in great shape. You'll want to play around with it to see what results you want. I knew I didn't wan't small crackles, but longer rips, crackles. So I went with a thin layer of the Crackles and I used Acrylic paint over the top instead of water based and I brushed over it more than once. I think it ended up PERFECT (3 & 4)! If the result you want is more crackle you'll want to use a water based paint and only spread on the top layer once, don't over brush.
After it dried for a good 24 hours, I sanded down the edges, inside (1) and out (2). Then sealed the whole table with the same polycrylic that I sealed the wood with originally (3). I did 3 layers of the polycrylic, sanding with 220 grit in between each layer.

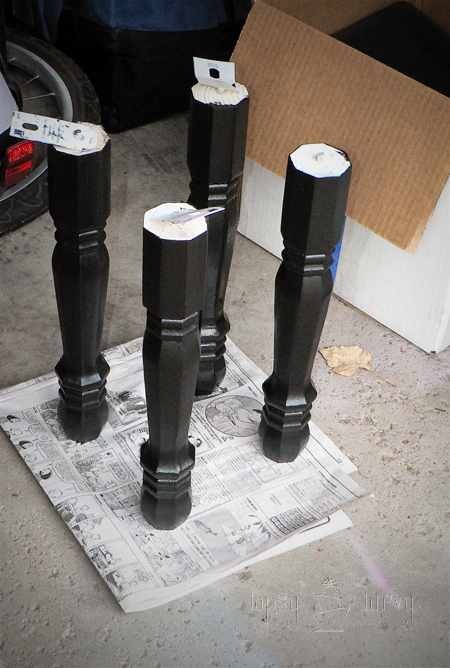
I got my table legs at Home Depot, but I'm sure any hardware store will have them. They had all kinds of heights and options. They had 4 inch, 8 inch, 15 inch and up to 30 inch legs. I went with the 15 inch legs, because I want this to go in front of my couch. I actually loved how this table turned out and am thinking about using one of the smaller windows I have left and making a taller table to go next to the couch, with the 30 inch legs!
ANYWAY... this is only part of the project I regret. I thought about aging them with the crackle paint, but decided against it because they are already so detailed AND I wanted the focus on the window. I'm happy with that decision. I went ahead and primed them before painting to save on paint. That is what I regret I wish I had sealed them with the poly acrylic so that I could have sanded the edges down just a bit. Oh well. I used a small 1 inch foam brush to get each of these 8 sides painted smoothly and get the details.
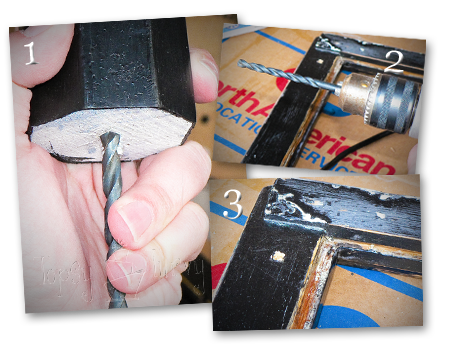
The legs I bought came with screws already installed. So I matched up my drill head with the screw (1). You don't want to go as wide as the teeth, just inside the teeth to the main part of the post (I'm sure it has a proper name, but I don't know, sorry!). Then I marked on the frame (bottom of course) where I needed to place my holes and CAREFULLY drilled in just over 1/4 of an inch (length of the screw on the leg) (2 & 3).
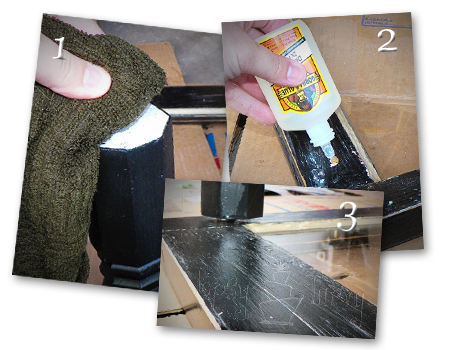
The best way to install the legs is up to you. I decided to go with Gorilla glue. So following the instructions, I got the wood on the leg post damp (1). The I squirted the glue into the holes I drilled (2). Remember that the gorilla glue expands so don't use too much! And finally screwed the leg into the pre drilled/glued holes!
To finish up I glued/screwed in all 4 legs. Then flipped it over and added weights. I also put the hardware back on at this point! Then I just had to leave it to dry! It's finished! Yipee!
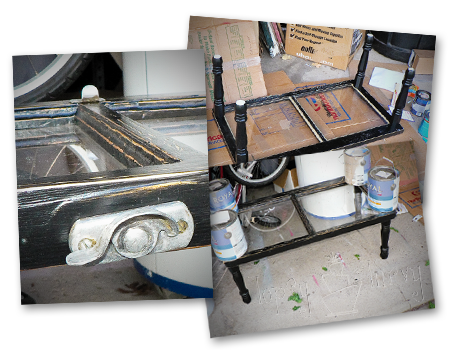
So it's done and time to take the final pretty shot! BUT we're in the middle of moving everything around in the basement we're living in so we can do some remodeling. SO I don't have anyplace to set this up... YET. I know JUST where it's going to go when I'm done, but for now it's sitting stacked in a room with other misc stuff... So here it is, right side up, but sadly not decorated! I am SO pleased with how this turned out! I just love it! It's exactly what I imagined when I started this project! I hope you guys like it, try it and send me the pictures!

Thanks again Michelle! I can't tell you how much fun I've had working on this and getting it ready for this guest tutorial! I'd love to have you visit me over at I'm Topsy Turvy. If you are thinking about placing plexiglass in an old window or frame, come check out my tutorial on my blog along with all my other crafts.

OK FOLKS! That is an old window idea that gets a big BOO YEAH!!!! from me (That's a huge compliment, if you don't know it). LOVE IT! I have to tell you that Ashlee is an amazing person and an up and coming blogger! She's got some great ideas on her blog already and will have a ton more in future. I strongly suggest that you visit her blog, and follow her!!! (When I make a strong suggestion (to my kids), it means you should do it and that goes for everyone reading this post too:) And if you are in the Salt Lake area and need a specialty cake, Ashlee is your go-to gal. She a rock star cake decorator!!!
Ashlee could use all the support she can get right now!
Linking to: Funky Junk - Saturday Nite Special, Tatertots and Jello - Weekend Round-up, Under The Table And Dreaming.


A pet pig? That's awesome. I love this tutorial and how the window table turned out. I have a window table that's similar but I didn't make it and wondered how I could make another. This is great and I like it painted black!
ReplyDeleteLoved Ashlee!
ReplyDeleteI like this very much! Excellent tutorial!
ReplyDeleteThanks,
Kathy
Ahhhh...luv this window table! Mr.CC made several of these when I had my shop...I was lucky enough to sell them for a big price:)
ReplyDeleteBlessings,
Linda
Ashlee is freakin' amazing! Love her project almost as much as I love her IRL!
ReplyDeleteFantastic! Reminds me of the side table from a picture frame that I saw once. This looks much sturdier tho. Love the paint job too.
ReplyDeleteKathy
Holey moley, that is stinkin' awesome! Now I'm wishing I would have driven up and got those windows. But at least if I couldn't have them, they went to someone as nice as Ashlee!
ReplyDeleteAmazing!
ReplyDeleteEeeekkk!!! It's out! I'm so excited! I just made sure that my glass replacing is up too! Thanks again SOOOO much, you have given me SO much confidence. And it was so much fun hanging out this weekend! We've got to do it more often now that we know each other!
ReplyDeleteI love topsy turvy!
ReplyDeletei love old window! SO CUTE! check out my satin flower tutorial http://dejavucrafts.blogspot.com/
ReplyDeleteHoly Cow. That is incredible, Ashlee! What an amazing table. Great job.
ReplyDeleteThat is incredible! I love the idea and your cakes are darling!
ReplyDeleteGuess what??? 99 followers as of now! THANKS again, your great and I just LOVED hanging out with you. If you visit your mom this summer I'll take you to lunch for a HUGE thank you and hug!
ReplyDeleteare u freakin kidding me? that woman is AMAZING, holy crap.
ReplyDeleteur blog is adorable! nice meetin you at the CBC!
Just popped over from Life at the Pitts
ReplyDeleteGreat tutorial! Thanks for all the tips and info
Loved the window table. My husband is an installer and just brought home some old windows with grids yesterday that will be perfect for this project! The table will match the window picture frames I have planned to remove from storage! I see a big table in my future! Thanks for sharing!:)
ReplyDeleteFABULOUS! And I'm doing this! I have all the parts right now in my basement. Thanks for the inspiration! Thanks for participating in Thrifty Thursday this week!Hugs!
ReplyDeleteLeigh
Tales from Bloggeritaville
wwwlbratina.blogspot.com
Ooh, this is really pretty. Who knew you could do that with a window?? You are so creative.
ReplyDeleteThank you for participating in the Craft Therapy Session with Life in the Pitts
Absolutely love your window table!!
ReplyDeleteDebbie
Hi there! I'm just stopping by to say I loved this so much, I Featured it today. Thanks again for linking up!
ReplyDeletehttp://lanieree.blogspot.com/2010/06/featuring-you.html
What a great project. Thank you for sharing...I will need to keep an eye out for windows in the future!
ReplyDeleteHello sweet Michelle - I'm visiting from The Inspired Room! Thank you for introducing us to Ashlee. Her window coffee table turned out fabulous!
ReplyDeleteBlessings,
Marie
http://emmacallsmemama.com
This is just darling! I have seen it done with an old door before, but not windows! Very cute! thanks for linking up with Sweet Charli! :)
ReplyDeleteVery creative! And I also like the fact that you changed it to plexiglass. Window glass is actually pretty fragile and dangerous as it's not made for weight. Getting the right glass for a purpose such as this is crucial. Your idea is even better!
ReplyDeleteThanks for linking up to Old Windows SNS!
Donna
http://funkyjunkinteriors.blogspot.com/
Opps! I meant Ashley's blog...this is Michelles LOL!!
ReplyDeleteLove Michelles blog {she is one incredible cake decorator!!} Love the window table! So creative and clever! Amazing transformation! Thanks so much for linking to the Sunday Showcase party! I greatly appreciate it! Hope you have a fabulous week! ~ Stephanie Lynn
ReplyDeleteSuch a great idea. that table turned out so cute. I love the black color and how old it looks. Very fun!
ReplyDeleteXOXO
jen