I'm so happy to be a guest blogger here today! My name is Maya, I'm the author of
and I'm going to show you how to make fabric lampshades from photographs.

I'm sure many of you have lots of digital photographs stored away that would look awesome backlit! I used to have a small business making lampshades from my photographs. They're all with a coastal theme, but the sky is the limit to what you can put on display.

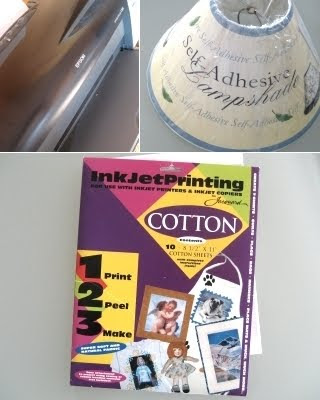
In a nutshell, I made this lampshade by printing a digital photo onto four letter sized inkjet fabric sheets that I cut to size and adhered onto a self adhesive lampshade.

So you need a printer, preferably one that uses pigment inks. They are much more fade resistant than dye based ones. I have a small inexpensive Epson printer that works like a charm. As to the self adhesive lampshade and inkjet fabric, you can buy both at your local crafts store (I went to Michaels) or find them online.

Use the wrapper as your template. This round empire lampshade required four sheets. So I folded the wrapper in half, then folded each half again. I simply repeated the same image, but you can do compositions too. Print your pictures out on regular paper and play around!

After I peeled off the backing paper and cut the fabric pieces to size I simply adhered them to the self adhesive lampshade, going around the shade, letting the edges slightly overlap...

... then covering up the seams with soutache ribbon which I bought in a fabric store. I love it because it's narrow and glues really well. I wrapped the top and bottom wire of the lampshade too, using a single pre-folded bias tape that you can find at fabric stores or Walmart. I glued it to the front first, then on the inside. You don't have to do that since the shade wires come paper wrapped, but I prefer the fabric finish.

This is how the glued bias tape looks on the inside.

And lastly, I finished off the top and bottom with a nice soutache as well...

... here we go, ready to be clipped onto a bulb! For many more Craft Project Ideas come visit me over at Completely Coastal. And for a quick overview of my site, check out the Most Popular Posts page, and perhaps you'll say hello too -I would love to meet new sea lovers!
Thanks so much Michelle for having me!
Thanks Maya! That is a very cool technique to know. I can see quite a few photos of mine on lampshades! I love beachy blogs and websites because it that is where I dream of being. Completely Coastal is definitely beachy and fun! I'm glad I can take a mini-vacation to Completely Coastal at almost any time and virtually for free!
Visti Completely Coastal today!!!
Linking to WATF - Works for Me Wednesday, Blue Cricket - Show and Tell, Thrifty Home -Pinching Pennies, ISVC-Celebrate the Holidays, Creations by Kara - Look What I Made , Life In the Pitts - Craft Therapy , Room To Inspire - Be Inspired, Just a Girl - Show and Share, Tea Rose Home , 733-A Creative Blog - Sugar and Spice


Love this idea. I'm thinking my new granddaughter's photos would be cute wrapped around a shade....
ReplyDeleteSo cute! I never would have thought of that! Great idea!
ReplyDeleteWhat a great idea. I bet that it was a good business. Something you don't see very often in stores!!! :)
ReplyDeleteHoly freaking cow, this is an amazing idea and the lamps look wonderful! Love the results and your how tos are well done. Thanks!
ReplyDeleteThese are such a fabulous idea and I loved that Maya shared the tutorial. How beautiful they are! ~Lili
ReplyDeletefabulous idea!
ReplyDeleteamazing! I can't wait to try it.
ReplyDeletewww.joybeadworks.blogspot.com
This is awesome!! How fun!! Thanks for the tutorial.
ReplyDeleteGreat job!
This was a great project. How could you do the shapes of lamp shades that don't come in the adhesive kind?
ReplyDeleteLove this idea! I saw lamps that had photos printed on acetate and they sold for a lot of money. Never figured out how I could re-create them. This solves my dilemma!
ReplyDeleteThanks for sharing.
Brittany
http://www.prettyhandygirl.com
Visiting from Remodelaholic ~ such a cute idea!
ReplyDeleteThat photo lampshade with the shells is AMAZING. Wow!!!
ReplyDeleteWhat a great idea, they're gorgeous! Thanks so much for the how-to, I'll be linking.
ReplyDeleteWow, what an unusual and neat effect the photos make! Cool idea.
ReplyDeleteDonna
Looove this! Linking! :D
ReplyDeleteLamp shades are the finishing accessories for antique lighting. Thanks for sharing a very interesting and informative stuff, keep it up!
ReplyDeletelamp shades boston