


It's Melinda from over at

Michelle was kind enough to invite me over to Someday Crafts to share my 2x4 Santa Tutorial. Thanks Michelle! Before we get to that a little about me.
.
I'm a wife of a dude that lets me sprawl my craft stuff throughout the house. I'm a mom to a teenage girl (if you have one you know what I'm talking about), a cute wannabe teen girl (she is only 8!!) and two boys that have sword fights with my bamboo knitting needles. It's a happy life with lots of crafting! My blog and etsy store all started when my husband started buying me power tools for my birthday and Christmas. I know, exciting right?! (He just bought me an air powered staple/nail gun. Watch out world! Here I come.) He told me to start creating and making stuff. He saw something in me that I didn't. I started creating things and who knew?!

Wooden Cookie Invite


Wooden Cookie Invite

Ok! Enough of that "me" stuff and onto the goods! A 2x4 Santa!

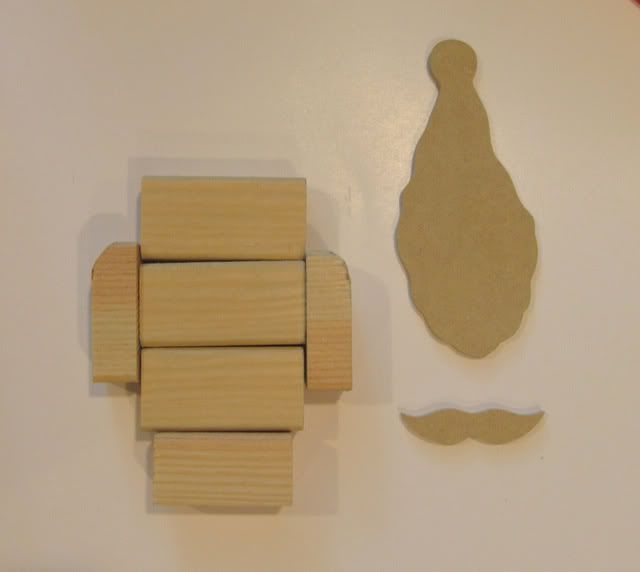
You will need a 2x4 or a 1x3. Either will do. I have done this two different ways. If you want your Santa to look like the Hunchback of Notre Dame from the side then skip this next step :) Cut your 2x4 in half lengthwise. Like this....

Then cut 3 pieces at 3 inches (the body), 2 pieces at 3/4 inch (arms) and 1 piece at 2 1/2 inches (shoes). Next grab your scroll saw OR trace the following pattern on chipboard, cardboard or cereal box.

My material of choice is 1/4 inch MDF so I used my scroll saw. My reindeer pattern is also traced on this piece of wood. Hop over to my blog for the tutorial.

Paint your pieces. Let them dry.

Sand the edges. Sand down the middle of the shoes to give the appearance of two shoes instead of one big shoe. A dremel works great for this step. Glue the pieces together. I like to use gorilla glue. Strong as a gorilla :)

Make sure you remember to glue the mustache on Santa and .....you are done!

Thanks for crafting with me and have a wonderful holiday!
THANKS, MELINDA! If you haven't visited Under My Umbrella, you are missing out! I found it over a year ago and have loved everything she creates. Major cuteness and the queen of 2x4 crafts. You simply MUST visit Under My Umbrella and become a follower so you can continually be inspired by this lady!!!! (And check out her etsy shop, if you want a very simple, but beautiful and inexpensive nativity scene.)


Just a quick note to let you know that a link to this post will be placed on CraftCrave today [01 Dec 01:00am GMT]. Thanks, Maria
ReplyDeleteLOVE Melinda's ideas! I copied the pumpkins that she made in October and I have plans to copy the cute little tree that is with this fabulous Santa. Thanks for sharing Michelle!
ReplyDelete