Thursday, October 7, 2010

Bleach Stencil Shirts


Our Family, Our Way

shows how to make simple bleached stencil Mickey shirts!!

IMG_4760

We have planned for an upcoming trip to Disney in October. In an attempt to be ahead of schedule (Ha!), I am trying to create some non-cheesy yet simple Family Disneywear without breaking the bank, and without disapproving my soon to be 10 year old. I would totally toddlerfy my girl in cute boutique Mickey attire if she hadn't somehow moved past that stage :(

First on the list was this simple, but great technique that I had seen used for something totally different but thought that it would work for me as well.

IMG_4774


1) Find a Mickey Head Template (which can be quite difficult) Here is the one I used. Just right click save as to grab it.

Mickey mouse head

You can open it up in paint and adjust the percentage levels for the size. For the kids I used 350% and for the adults 400%. If distorted, its alright.

2) I learned by trail and error but lay the shirt flat and between the top and bottom portion by the tag, lay some aluminum foil in between. Two of mine have bleed through, but oh well. We are keeping them :)

IMG_4759

3) Mix a spray bottle with about 20% bleach and the rest water.

4) Cut the printed Mickey head and lay about 3-4 inches from collar. You can also print a font of your childs' name too. I happened to have some cheap iron-on letters from Wal-mart handy, so I used those.

5) Make sure sprayer is at a fine mist spray. Spray directly up in the air letting the water and bleach fall to the shirt, while shapes and letters are covered. I sprayed about 20 times of fine mist. Just a matter of the look you are going for.

I still have to make Daddy's, but so far so good.

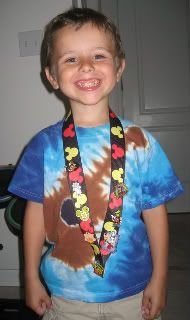
Disney themed non-cheese attire. Check. Stay tuned for further projects. Tie Dye Mickey.

Can't wait to see all the inspiration! I am actually leaving for Disney this Friday! Woo-hoo!

Have a great day!

Angela:)

Thanks Our Family, Our Way f

or showing us this easy, non-cheesy way of making Disney shirts!


post signature

Trading Pins and Lanyard

brings us these great tips about a lanyard for Disney trading pins.

A while ago, my friend Joe, wrote about his Disney Trading Pins. The pins are not cheap to buy but he let me know that he had gotten some on ebay for about $1.15 each. I gave it a try and was surprised one night when I forgot about an auction I had bid on. I received an email letting me know I was the winner! Cool! I won 20 pins for less than $1 each, shipped. Thanks to having some money in my Paypal account (from Cash4books), I didn't actually have to spend any money out of pocket.

Once you have pins, you also must have a way to display them. Disney sells lanyards with pins and without. Without pins, a lanyard will run you about $8. I figured we could make one for cheaper than that. I was right. Of course ours are different but I still like them and they are Little Monkey approved! I went to Joann's with a 40% off coupon and bought two yards of Mickey Mouse Belting. There were other options including Finding Nemo, Winnie the Pooh and other Mickey ones. I decided that the Mickey heads would be the best to go with for now. The belting is normally $6.99 a yard. I ended up making two lanyards from two yards of belting. They are not the same length. One is longer, more for an adult and the other is shorter, the one that Little Monkey is wearing in the picture. We will keep some of the pins on the longer one for now and let him use the shorter one for going to Disney.

I am excited for Little Monkey to go to Disney and get to trade pins with the employees. So far he has picked out a few that he does not want to trade. (Buzz, Mr Potato Head with a Goofy Hat and the Monorails) Interesting choices, but hey, whatever he wants! I hope he likes trading the pins to get ones that he would like. I have a feeling Toy Story pins will be at the top of the list. They should be abundant now too with the new movie coming out. I think he will probably also want some Cars, Finding Nemo and Monster's Inc ones.

Thanks What A World

for making us more aware of pin trading and for how to find them inexpensively!!!!

post signature

Minnie Mouse Outfit


Hi! I'm Pati from A Crafty Escape

and it is my pleasure to be here at Someday Crafts during Disney Days. We are lucky to be annual pass holders since we live just a couple of hours away from the parks. We love all things Disney and this outfit was just one of the ways we made a trip special. Enjoy!

I am very proud to post my very first complete outfit... and just in time for our trip to Disney! I was inspired by this one. The minute I saw that picture in my reader, I knew my daughter had to have it for our upcoming trip.

I changed things a bit based on what I had at home and taking the weather into consideration. I highly recommend
this tutorial for the skirt, so cute!

I've been wanting to make korker bows for a while and finally went for it! I followed
this tutorial and LOVE how they turned out. I can't believe how easy they are to make. I made two so they can be used for pigtails, and attached them to lined-alligator clips.

The verdict: My daugther LOVED it! We had to cut the photoshoot short because it started to pour, but she made sure to get in a couple of twirls before going inside. Apparently the skirt is very "twirly-swirly" and that makes it a hit in our house
for the links to some great tutorials and an idea of how to make a darling Disney Outfit!

post signature

Money,Time, and Energy Saving TIPS!!!


shares more information about saving money, time and energy when going to Disneyland! These are awesome!!!! Read through them and you will be happy.


Wouldn't it be great to wake up one morning, load the kids up in the car, fill the tank with gas and just go? No worries in the world, an unlimited amount of money to spend, no set time that you have to be back home? Your destination, of course, Disneyland! You can ride all the rides, eat as many churros and turkey legs as you want, buy a different Mickey Mouse hat for each day you're there, eat some more churros and maybe a chocolate covered banana, purchase a $12 picture after you get off every single ride (which always seem to catch you at the worst moment), eat a $22 Monte Cristo Sandwich 3 meals a day and still have money left over to buy your son that $45 Buzz Lightyear costume that he will wear once and lose in the back of his closet as soon as you get home (He just HAD to have it)! I would probably also throw in a few meals at the Bengal Barbecue, a couple Dole Pineapple Whips at the Enchanted Tiki Room, and a chimichanga or two (or three).

The truth is, this is my dream. To be able to experience Disneyland WITHOUT a budget. Unfortunately it hasn't happened. Does this mean that I won't go back to Disneyland until it does? Absolutely not! I LOVE Disneyland. As I walk in the front gates I get the same feeling that I do waking up Christmas morning. It's the one place that I feel like I can let everything go and just be a kid again. The only word to describe it is MAGICAL!
My guess is that we are not the only ones who have to experience Disney on a budget and there's nothing wrong with that. With a little careful planning, a little creativity and a lot of patience you can plan a Disneyland Vacation that meets your every expectation without robbing your child's college fund. I want to share a few tips that we have learned throughout our Disney travels.


First of all, we are a family of four with two small children so a lot of my tips are centered around the smaller ones. I'm going to break this down into a few different categories: Tickets, Hotel, Meals, Parking/Transportation, Souvenirs, and Miscellaneous Expenses. Tomorrow I will be discussing time and energy saving tips to get the most bang for your buck and make your trip stress free. (If that's even possible when you're surrounded by hundreds of screaming children)


1. PARK TICKETS


There are a variety of ways to purchase tickets for Disneyland. The first and most obvious is to buy them at the gate the day you arrive. Unfortunately, this is also the most expensive way to buy them. A one day park hopper ticket which allows you access to both Disneyland and California Adventure costs $91 for children ages 3-9 and $101 for ages 10 and up. You can also purchase tickets online at disneyland.com They offer special online discounts when purchasing 3, 4, 5 and 6 day hopper passes. The more days you stay, the more money you will save.

Another way to save money on tickets is to check travel agencies in the Anaheim area. A simple google search lead me to several agencies like THIS one that would save you an additional $5 off the already discounted online rate. In addition you can look for package deals offered through companies like Costco and AAA.


A search on Ebay also turns up many possibilities for drastically reduced ticket fees. Sellers such as wiiwouldliketoplay, offer deals up to HALF OFF the ticket price! It may seem too good to be true but its well worth looking into if you have the opportunity to save that much money!
2. HOTEL:


There are many things to consider when choosing a hotel for your visit. While cost is probably the most important factor, you may also want to consider proximity to the parks, if a continental breakfast is served, room vs. suite and so on. While there are 3 hotels located within Disneyland they can end up costing you hundreds of dollars a night so I suggest that you search for a
DISNEYLAND GOOD NEIGHBOR HOTEL or other budget hotels in the area. Websites such as PRICELINE and EXPEDIA often have very good deals on hotels that can save you hundreds of dollars.
3. MEALS:


Lets just face the facts, food is EXPENSIVE at Disneyland. There is no way that the average family on a budget could afford to eat every meal at the park and still be able to afford all the yummy snacks and drinks they offer. My first suggestion, as I said above, is to find a hotel that offers a continental breakfast. You will save a lot of money if you're paying for one less meal every day. Our family also likes to pack donuts, pop tarts, granola bars and juice to snack on while we're waiting in line for the park to open. Another option if you are driving to the park is to pick something up on the way. There are several fast food chains located near Disneyland.
Coolers are not allowed in the park but you are allowed to bring snacks. We like to bring a backpack full of snacks which we leave in a
LOCKER on Main Street (more on those in a bit) for easy access whenever we are hungry. We bring things like bottled water, juice boxes for the kids, jerky, fruit snacks and so on. I like to find snacks for the kids that have Disney characters on them so they still feel like they are getting something from the park. You can find many different varieties of Disney fruit snacks, cookies, crackers, and dried fruit crisps at Walmart and other grocery stores.
There are several restaurants within the park that serve great food but also are quite pricey. My absolute favorite and probably one of the most expensive is the
BLUE BAYOU which is located in the Pirates of the Caribbean ride. Lunch entrees cost an average of $20-$39! Another restaurant, located in Frontier Land, is the BIG THUNDER RANCH BARBECUE where the average plate ranges from $15-$39 per person. There are a couple more budget friendly restaurants that I recommend. THE HUNGRY BEAR RESTAURANT, located in Critter Country and PIZZA PORT,located in Tomorrowland both offer great food for less than $14 per person. Another personal favorite is the BENGAL BARBECUE which is located near the Jungle Cruise and Enchanted Tiki Room. It offers delicious beef and chicken skewers, as well as pretzels and yummy deserts. The average meal is around $10 a person.
There are several other ways to save money on food when visiting Disneyland. Consider only eating one meal a day in the park. If you are staying in a hotel suite with a kitchen you can easily head back to the hotel in the afternoon when the children are in need of a nap and prepare dinner for a fraction of the cost you would spend in the park. You can also go to one of the many fast food restaurants located close by. Saving money on large meals will allow you some extra cash to splurge on some of the yummy treats that I mentioned at the beginning.

4. PARKING/TRANSPORTATION

One of the great things about staying in a Good Neighbor Hotel or other hotel located close to the park is that they offer transportation to and from Disneyland. The ANAHEIM RESORT TRANSIT. will pick you up in front of your hotel and drop you off right outside the gates of Disneyland. It runs approximately every 20 minutes throughout the day so it is very convenient if you need to head back to your hotel for a little rest! It saves you time and eliminates the stress and headache of dealing with SELF PARKING and riding the tram into the park. The cost for a 1 day pass for unlimited use is $4 for ages 10 and up and $1 for ages 3-9. They also offer 3 and 5 day passes for a discounted rate. Parking your own vehicle for one day at Disneyland ranges from $15-$25.

5. SOUVENIRS
I can guarantee that at some point during the trip you will get so tired of your child saying "I want that!" " I need that!" "Will you buy me that?" that you will finally give in and spend a ridiculous amount of money on something they don't need just to shut them up. I know that sounds harsh but it is true. You may say, "We just won't go into the gift shops", but those Disney people are smarter than you. They won't let you avoid it. They suck you in by making you walk through the gift shops as you exit the rides. There's no other way out. They trap you and set you up for those "I want, I want, I want" moments. This is where your creativity comes into play.
There are several ways to save money on souvenirs. We are going to Disneyland in a couple weeks so I will share with you some of the ideas I have come up with. First of all, I made T-shirts for the kids to wear. I also made a Minnie Ear Headband for my daughter and a Mickey Ear Pirate Hat for my son which saved me about $12 for each if I were to buy them in the park. Using t-shirts I bought at the Dollar Store and all other materials that I already had on hand, I spent a whopping $4! I will have a separate post about them later in the week.

Remember before when I mentioned that $45 Buzz Lightyear costume?If your child insists on going to the park dressed up you can go HERE and find a similar Buzz costume for only $12. They also have a variety of Disney Princess costumes for $12-$19. Consider making your own autograph book by getting a small notebook and letting your child decorate it with Disney stickers. Another thing that I am doing for my kids is making them treat bags. A while back my church had a free yard sale and I hit the jackpot when I found some Winnie The Pooh and Piglet stuffed animals. They were brand new and still had the Disneyland tags on them. They are dressed in Halloween costumes and since we are going at Halloween time they are perfect for my kids. I will be putting them in the treat bags with other items like Disney coloring books, crayons, snacks, and many other Disney items found at the Dollar Store. I realize that this may not work for older kids but another idea to consider is giving them a Disney gift card that can be used at any location in the park. Once the have used it up, then no more souvenirs. You can purchase them on disneyland.com.
Now if you're not the crafty type and don't want to make shirts or hats there are still plenty of options for saving money. You can find Mickey, Minnie and many other Disney character t-shirts and sweatshirts at Walmart for as low as $5. You can also check party supply stores and websites such as
THIS one for cheap Disney products.


Time and Energy Saving Tips

Let's discuss some more tips that will help you save lots of time and energy while visiting Disneyland. It is The Happiest Place on Earth after all and you don't want to spend the entire vacation so stressed out that you forget to enjoy yourself.
The first item on the agenda....PACKING! This is probably the worst part of going on a vacation, especially if you have a large family. Even if your children are old enough to pack for themselves, chances are you will still end up going through their suitcases before you leave to make sure nothing gets left behind. Here's a couple tips to help you cut down on a little bit of stress when it comes to packing.


One thing that I always do when we travel is pack a small shoe box size tote full of essentials. Since someone in our family always ends up sick on vacation, I pack everything I can think of that we might need; pepto, gas-x, ibuprofen, tylenol, cough medicine, NyQuil etc. You name it, I pack it. Other items I have in my tote are q-tips, a manicure set, floss picks, mouth wash, razor, eye drops, band aids, neosporin and more. I keep most of the items in it at all times so I don't have to pack them every time we go somewhere. It helps out so much if we forget something or if we end up needing something in the middle of the night, in a city we're not familiar with and don't want to leave to find a store. As I said in my last post, many stores around Disneyland have a higher markup on products so it is smart to be prepared and bring items from home.


Here is a wonderful packing tip that I found at Rocks In My Dryer. She uses 2 gallon ziplock bags to lay out an entire days worth of clothes for each child. It makes it so simple to pull it out in the morning and not be worried about having to find clothes for everyone. Once you're back home just leave the used bags in your suitcase and use them again next time.

Next is a section I like to call....KNOW BEFORE YOU GO.

If this is your first visit to Disneyland then you will want to be familiar with the layout of the park before you go. Maps like the one below are very helpful. It gives you an idea of where all the major attractions are located so you can plan which ones you want to hit first without running all over the place from one end of the park to the other and wasting a lot of time. You can find several maps of Disneyland Park here.


There are several other wonderful resources dedicated to saving time and energy on your vacation. One that is fairly new is the Mobile Magic application available through Verizon Wireless. Mobile Magic provides FASTPASS return times, attraction wait times for the park you are in, information on character locations and more for Walt Disney World and Disneyland theme parks. Since we have not been to Disneyland for a couple years we will be using it for the first time when we visit in 2 weeks. I think the $9.99 download fee will be well worth the time it saves us since we will only be there one day and want to be able to see and do as much as possible.


Two more helpful time-saving features of Disneyland Park are the FASTPASS and Rider Swap Pass. Rider Swap is when Guests take turns waiting with children too small to ride a certain attraction, then "swap" with another adult Guest from their party to experience the ride without standing in line twice. You can ask a Cast Member at any ride entrance for a Rider Swap Pass. A FASTPASS is a ticket that holds your place in line for a ride. It lets you leave and do whatever you want and then come back during a specified time frame to avoid the line and get straight on the ride.

You will also want to visit disneyland.com before your trip to check park hours and the scheduled activities for the time you will be there. You may want to make up your own family schedule ahead of time so you don't miss out on any shows or special attractions that you or your children want to visit.
WHILE YOU'RE THERE........


I strongly suggest arriving to the park early. If the park opens at 8:00 you will probably want head there around 7:00 to ensure a good place in line. It may seem early with small children but I can assure you that the park is very crowded in the afternoon and you will be grateful that you beat the crowds and lines. If you are taking the Anaheim Resort Transit,it begins running 1 hour and 20 minutes before the park opens and runs every 20 minutes after that throughout the day. The last bus of the day runs 30 minutes after the park closes.


Once inside the park our family likes to get a locker right away. There is a limited amount and it is on a first come, first serve basis. It also saves us from having to carry extra bags around all day. After that we like to head to some of the more popular attractions and get FASTPASSES right away. We like to ride as many of the big rides as possible in the morning when the park isn't as crowded and the lines aren't quite so long.


Once we have ridden all of the larger rides we like to head over to Fantasyland
to ride the smaller rides. The lines aren't usually as long there in the afternoon and it's nice to slow down for a bit and recover from the busy morning. When the kids are in need of some rest we like to head over to the
Enchanted Tiki Room and enjoy a show while resting our feet.

When it comes to choosing a time to eat, let me make a few suggestions. Don't go right at lunch time or right at dinner time. Brings snacks to hold you over and consider going mid-morning or mid-afternoon when the restaurants aren't quite as packed. We usually go to Pizza Port whenever we are there and we always end up standing there with our food like vultures waiting for a table to open up and then we swoop in on it. Since it is one of the more affordable restaurants in the park it is often very busy. You can also call in advance and make reservations for restaurants like theBlue Bayou and Big Thunder Ranch Barbecue.


I have one last tip to share that will hopefully save you some time and stress. There are several regularly scheduled events that take place throughout the day at Disneyland. Parades, shows, fireworks, and more. If you are staying there for a few days and don't mind missing these activities then head over to your favorite rides while everyone else is enjoying the show. The lines will be much shorter and you will be able to enjoy them without waiting for hours.


Please visit The Terry's - Living A Dream

to tell them thanks for their great tips on making the most of Disneyland on a budget!!!!


post signature

Giveaway Directory #28


<center><a href="http://somedaycrafts.blogspot.com"><img src="https://blogger.googleusercontent.com/img/b/R29vZ2xl/AVvXsEhPvZQCvuj-QeZiqhz3n1WM2eZ6OmvENER03bMCA4xabZ6CJBeziZdW6JRdRLdN77lgr4rorE4pfL6qyn7gokh4uCD7YOtfo7Jg0L-ytl8xjckmJDaCXtQT57QXG9kigHj_n_aUdxiOBiow/s400/givedir.png"/></center></div>


Here is your best chance at FREE stuff on the web!!! Join these giveaways!!!!

If you don't know what this is, the giveaway directory is a place to promote a giveaway on your blog of your "goods" (or even someone else's). Link up the giveaway. If you are looking to win free "stuff," visit the other blogs and enter. It's that easy!!!! Some of these giveaways only have a few entries so your chance of winning is great!


I only leave this link open for 24hrs because giveaways are time sensitive. So if you are going to have a giveaway in the future and want to link it up here, please plan it accordingly:)

What is free on the internet this week! Let's find out!

post signature

Wednesday, October 6, 2010

So Talented!

You guys amaze me week after week!  Check out some of these super cool projects that have been linked up at todays WGW party: 
The Chic Uniquery turned these $5 candlesticks into a great Halloween display.  Not only did she beautify the candlesticks, but she even gave the pumpkins a makeover! Pop on over HERE to see how she did it.

Everyone loves a good remodel and that is exactly what My Pretties did with her new door!  And who says that a good remodel has to cost a lot of $$$?  This gorgeous door is a trash-to-treasure if I've ever seen one.  Thanks for the inspiration Kristy!

I have this thing for the big word EAT hanging in kitchens.  (Anyone watch Cougar Town?  I'm dying to steal her letters!).  When I saw Calamity Annie link up her DIY version I had to pop on over, and you should to!  So many options for personalizing these.  I really should make a set of my very own.

Can you believe this crafty pumpkin topiary?  What a fun, new way to display those pumpkins!  Head on over to Simpsonized Crafts to find out how to make your own!

post signature

Minnie Mouse Outfit

Photobucket

This wonderful Minnie Mouse tutorial brought to you by
Fussy Monkey Business


Today I have the bottom half of a Minnie Mouse outfit. I have a white t-shirt to go with the skirt. I am going to have it monogrammed soon. I am sharing 2 tutorials today. For the skirt and the ears hair bows. The bloomers are a pair of shorts just like the Snow White shorts, but I ran elastic thru the cuffs of the legs and added the eyelet trim. L-O-V-E It!

Here's what you need:
Skirt:

-2 Coordinating Fabrics
-Elastic
-Thread

Hair Bows:

-Black Felt
-1" Grosgrain Ribbon
-Extra Thin Ribbon(not sure the measurements on the small ribbon)
-Thread and Needle
-Stick Pin
-Hot Glue Gun and Glue Sticks
-Alligator Clips

Directions on the Skirt:


This skirt measures for a size 3T. Make your adjustments accordingly. Cut 8 4"x11" strips from the red and 8 6"x11" strips from the black.


Next, you just start sewing the long sides together, alternating colors. If you have a serger, that's great. If not, make sure to zig zag the edges to cut down on fraying. I did a straight seam first, and then a zig zag stitch.


Once you have sewn all of the pieces together, connect into a complete circle.


Press. Try to get all the seams pressed down in the same direction. This will help you later when running the elastic thru the casing. For the hem you will need to press 3/4" down and fold it under again and press to hide all raw edges. You will want to do the same for the waist, except fold down 1", and turn under, hiding all raw edges.


Stitch a seam all the way across the hem as close to the edge as possible. On the waist, you will want to leave an opening to run your elastic thru. Cut the elastic to the desired length. Put a safety pin on each end, and run it thru the casing.


Sew the ends together, making sure that the elastic hasn't turned, and stitch up your hole.
For the tulle skirt underneath, I just folded over the fabric ran a running stitch all the way down 1" from the fold.


Run the elastic thru and then sew up the seam. There was some excess, so I just trimmed the bottom when I was finished. Tulle doesn't fray, so no hemming:o)


Now for the ears:
Here is a pic of the supplies:


Make yourself a circle pattern. I used a circle cutter and it is 2 1/2" in diameter. Pin to felt, and cut 2.


Now here comes the tricky part. I will do my best to explain how to make the hair bows, but you may be better off searching online for some tips:o)

I made a 2" hair bow, so fold the ribbon over itself until you have this:


Can you see that there is 2 loops on each side? Now flare those pieces out...


Take your needle and thread and stitch that into place. Tie it off. Then wrap the thread tightly around the ribbon to make it look like this:


Make sure to tie that off as well. Now comes the fun part...hot glue...get ready to get singed;o)

Take the thin ribbon and place it in the center.


Place a small dot of glue on the back and wrap the ribbon around the thread. I know the picture looks like the ribbon is already wrapped around, but it isn't:o) I wound the thread around several times, and the flash bounced off of the thread.

Glue the bow to the circles, and then glue the circles to the alligator clips, making sure to have the clips facing opposite directions.


And that's it:o)
Ta-da


Photobucket

Visit her and tell her thanks today!!!!

post signature

Related Posts Plugin for WordPress, Blogger...