Saturday, July 23, 2011

Guest Blogger - Kitchen Counter Chronicles - Tea Towel Hanging Bags


Kitchen Counter Chronicles


I am excited to be here at Someday Crafts, sharing my crafty ideas with all of you. Hope you enjoy my post today!


I love vintage aprons and tea towels. Today's tea towels are typically pretty boring. Tea towels from the 50's and 60's were so much more interesting. Some of my vintage tea towels are in better shape than others. I have been looking for a way to repurpose some tea towels...give them a new life. Then one day it hit me...transforming the tea towels into handy sacks.


Here's what I did.


You will need:

1 vintage tea towel
coordinating thread

iron
binding tape

2 hooks (and anchors if necessary)
screwdriver
measuring tape
pencil


Steps


1. My vintage tea towel was rather large, so I cut and hemmed it down to a 34" X 17" piece of fabric.


2. Fold your tea towel, bring the bottom edge up at approximately 15" and press the fold.


3. Sew along the sides of the tea towel...creating a large pocket...leaving about 6" piece for the flap.


4. Turn the sack right side out and press.


To make the loops:


5. Cut 2, 5"pieces of binding tape or ribbon.


6. Fold the pieces in half and pin on the backside of the sack at approximately 7" from the top and along the side seam.


7. sew the loop in place...leaving a 1" loop at the top


8. Hang the hooks in the wall or door - following the manufacturers directions.


9. Hang the bag on the hooks.


I filled mine with potatoes and hung it just outside my kitchen...on our backdoor. My 5 year old daughter suggested we put our flip-flops in the bag during the summer...great idea! These bags could be used for anything from toys and shoes to laundry and onions. I love that vintage tea towels have such a great texture - they feel soft and well worn.

I hope you come visit me at Kitchen Counter Chronicles.


THANKS for sharing this cute and easy way to make a hanging bag. I have a few tea towels in my craft room that I could definitely use as bags!

Head over to Kitchen Counter Chronicles to see more!

Spruce Up Your Outdoor Spaces


Not JUST a Housewife recently finished hosting The Outdoor Spaces Event wherein she showed quite a few projects to spruce up an outdoor space. She did these in her backyard and they are ALL so cute! You need to see all these ideas!!!! The last link is an Outdoor Space Link party! There are some AMAZING ideas there too! Have fun looking through all these!


Friday, July 22, 2011

Guest Blogger - Simple Simon & Co. - Decoupaged Patterned Boxes

Hi! I'm liZ from over at

Simple Simon & Co


Simple Simon and Co.

There, my ridiculously talented sister-in-law (who is also named Elizabeth) and I post our daily sewing, crafting, and kid related projects.
Today we are super excited to be here at Someday Crafts with a little project I've been working on. Among other things I hoard, I mean I collect, vintage patterns. And well, my "collection" had gotten out of hand and I needed some sort of system to store them in. I wanted something that would keep my patterns tidy, easy to access, and look as cute as my patterns do.

Here's what I came up with:


Mod Podge Patterned Pattern Boxes.


They are easy to make and absolutely perfect to store your sewing patterns in.

Here's what you'll need:
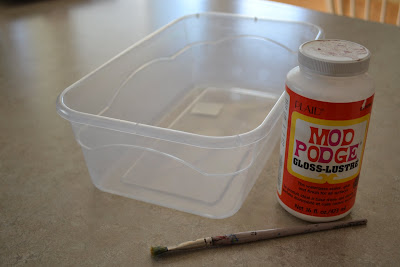
*5 Quart storage bins (I bought mine at the Dollar Store but they also sell them at Wal-Mart)
*Mod Podge
*An old paint brush
*Some old patterns that you are willing to part with

Just a note here about the patterns---I can't bear to see any potentially good patterns being wasted---even if it is to decorate something I want. SO I chose patterns that should never ever be sewn again to use for this project. That way I wasn't destroying something that I may want later and I was saving the planet from pregnant women walking around wearing that red jumpsuit.


Now. On to the instructions:


#1. Using your paintbrush, slather some Mod Podge over the area of the bin you are going to start covering.


#2. Lay a piece of pattern over the area covered in Mod Podge. Press it down firmly with your fingers or the paintbrush. (Note: Patterns are very thin so be a gentle...)


*Don't worry about having to fold the pattern over on itself around corners. That will happen. As for the wrinkling...don't worry about that either. Wrinkles happen and it's ok. It will give your bins texture and character.


#3. Use large pattern pieces first and then fill in any blank areas with smaller pieces. Do this until your entire bin is covered with patterns.


#4. When your bin is covered go over the ENTIRE surface with your Mod Podge. (This will give the frail pattern paper a protective layer that will become hard and prevent your bin from getting rips and tears. Plus it makes it look shiny and cool.)


#5. Hot glue a big old ribbon to the front. (I used strips of scrap fabric to make mine.)
And now your done!


(However, if you are really particular about your patterns you could skip the bow and make a cute label for the front detailing the sizes or styles of patterns in each bin. Obviously I didn't do that with mine...as per most of my projects I chose fun over practicality...)


I love my little army of pattern boxes. They are exactly what I needed--I can easily flip through the contents of each bin, the patterns are organized by size and style, and of course, they look good on my shelf. It was just what I needed.


Thank you, Michelle, for letting us share one of our projects amid so many other amazing tutorials. We have been so excited to be a guest on your amazing blog and we had a lot of fun putting together our project.


Thanks again,

liZ
Simple Simon & Co


THANK YOU, liZ!!!! My favorite projects are ones that are quick, simple, inexpensive and turn out really cute and this is definitely one of those "favorite" type projects!


Head over to Simple Simon & Co to check out all the AMAZING tutorials and ideas there. You will spend hours looking around!

Camp Funk Adoption - Crafting For A Cause (Link up your Cause)


Adoption stories make me cry! I think adoption is such a wonderful thing. I especially love the brave lady who gives her child up for adoption to give him/her a better life. What courage and strength!!!

This month, the Crafting For A Cause is to help the Funk family adopt a sweet little girl who needs a family. Even though they already have 4 kids of their own, they want to bring a child into their family who the love and support that comes from being part of a family. The cost of adoption is very high (over $13,000) and the Funk family is looking for either monetary donations or crafty donations for an auction.


Head over to Ladybird Ln. to read more about the Funk family, this month Crafting For A Cause. There are two parts HERE and HERE.


You can also read about the Funk family on their family blog, Camp Funk HERE.


We feel so blessed to have the family and freedom that we enjoy. We do not have a lot of money at our disposal... but we can craft. That is kind of the idea behind Crafting for a Cause. We hope to showcase you, and simple projects that we can all participate in that will make a difference. We are excited for this journey, and we hope that you will join us! Please join with us in either helping with this cause or share your service/charity project by participating in our monthly linky party. Too often, we all get caught up in our own lives. Let's use blogland as a way of "doing good" for the world and improve it with at least one act of kindness a month.


If you have a service, cause or act of kindness you want others to know about, link it up here to a specific blog post about the good you want to do. Please do NOT link up an Etsy shop or something else to earn money for some material item you want to buy. Exploiting this cause is NOT cool.


Let's put aside our "WANTS" to help others with their "NEEDS."


Thursday, July 21, 2011

Guest Blogger - Its Sew For You - Rainbow Dress


Hello! I'm Melissa from


and I'm SO excited to be helping out Someday Crafts during her maternity leave...congrats on your sweet new baby!


My little girl loves rainbows right now. She usually refuses to wear anything I make her, but was begging for a rainbow dress, so I happily obliged!


This was such a FUN and EASY dress to make, and my Dolly loves it!
Supplies:
a tank that fits the child well
several old shirts/tanks for the dress
Use a zig zag or stretch stitch around waist to avoid broken threads


I started with a pile of my old shirts and tanks and laid them out in order to get a feel for how it would look. This isn't your traditional primary color rainbow, but a bit of warmer tones!


  • I started by cutting the pink tank top 1" below the arm hole.


  • I cut the next layer (orange) 2 1/2" and made sure the length (sewn together) matched the tank

  • Pin right sides together and stitch


  • Yellow, green, and blue were all cut at 4" and a width of 2x her waist. Some of my tanks weren't wide enough to do the width in two cuts, so there are multiple seams in each row!

  • Stitch these together


  • The Bottom Purple ruffle was cut at 5" tall and the width was 2 1/2 times her waist


  • Fold over for a clean seam on the bottom and sew the three edges together (two purples and the blue)


  • Sew a gathering stitch along the top yellow layer and pin to the orangeband.


  • Sew together and you are finished!


  • These lengths worked perfectly for a 4T dress that hit my daughter just below the knee

    Now go out and enjoy your day!


And come visit me at It's Sew For You!!!


THANKS, MELISSA for the great rainbow dress tutorial. What little girl wouldn't love a comfy t-shirt dress in the form of a rainbow! Great idea.


Visit Its Sew For You to see more awesomeness!


Giveaway Directory #66


<center><a href="http://somedaycrafts.blogspot.com"><img src="http://i1213.photobucket.com/albums/cc462/seventhirtythreeblog/Someday_Crafts/Giveaway_Directory-1.png"/></center></div>


Here is your best chance at FREE stuff on the web!!! Join these giveaways!!!!


The giveaway directory is a place to promote a giveaway on your blog of your "goods" (or even someone else's). Link up the giveaway.

If you are looking to win free "stuff," visit the other blogs and enter. It's that easy!!!! Some of these giveaways only have a few entries so your chance of winning is great!


I only leave this link open for 48hrs because giveaways are time sensitive. So if you are going to have a giveaway in the future and want to link it up on Someday Crafts, please plan it accordingly:)


Wednesday, July 20, 2011

Amazing Party Highlights


There are way too many awesome projects linked up today! Here are a few that stood out to me!


There is more than one reason why Tidbits at the Tremaynes is one of my favorite blogs. She is hilarious and is constantly cranking out projects like this window bed! How is that for AMAZING!!!!!


Combined two shirts into one to make this cutie at Inspiration and Realisation.

There are so many amazing variations of sunburst mirrors. I'm loving this wood one from Thrifty and Chic.


What do you get when you combine a circle skirt and a maxi skirt together? A circle maxi skirt like this one from Show Tell Share.


Who wants a sliding barn door inside their house? ME!!!! See this beauty over at Breakfast for Dinner. Gorgeous!


Learn how to make your own nail polish with Heck Fridays! How fun is that?


Check out more amazing ideas from the Whatever Goes Wednesday party!


Whatever Goes Wednesday #75


Welcome to this crazy day of linky love and blog exploration! I love to see what is new out there in blog land. Get started clicking away to view everyone's creations!


I've been a little disappointed with how few clicks the links are getting. Please stick around and click on at few a links before leaving. Don't be a link-and-run blogger!


NEW SPONSOR


Do you love stamping, scrapping, paper crafts, sewing, fabric crafts, etc? Don’t pay retail! Stampin’ Up! has it all and now you can sign up to receive a lifetime of discounts for only $99! Plus Stampin’ Up! will give you a beautiful Christmas Keepsake Gift Box project ($40 value) FREE! For more details and additional offers, visit Stampin', Scrappin' and Crafts.


MOST VIEWED LINK LAST WEEK!


Get a french manicure without paying a lot of money. The 2010's Housewife shows you how! Super nice look for a budget!


BLOG TIP


The blog tip of the week is from seven thirty three - A Creative Blog.

If you have a shop or are looking to create a website but don't want to pay high hosting or designer fees, then you want to see this.


Now you can host a website on Blogger for only $10 a year and Kim can help you create an AWESOME site for your customers or target audience for a very reasonable price. This is an inexpensive way to start or continue your business! Check out this post to learn more.

If you are looking for someone to add some spice to your blog or a website, I HIGHLY recommend Kim at seven thirty three - Custom Blog Design.


CRAFTING FOR A CAUSE


Crafting for a Cause


Stay tuned this Friday to learn about the wishes and dreams of the Funk Family and how you can assist them! Also, there will be a link party for anyone who has a charity or cause they want other people to know about.


Stay tuned for the next Crafting For A Cause.


Don't forget to check out the Giveaway Directory tomorrow! It amazes me how few people enter giveaways. This is your chance at free stuff! FYI, this link is only open for two days. If you are going to do a giveaway and want to feature it here, make sure you link it up sometime on Thursday or Friday.


Stay tuned for the next Categorically Crafting.


You know what to do. Enter your project (up to 4 links), tip, idea, recipe, whatever. Visit others. Leave comments. PLEASE NO ETSY SHOPS! Come back again in the next few days more projects are added throughout the week. Let the fun begin! (Because blogging is not my full-time job, I will not be able to visit every link. I apologize.)


Tuesday, July 19, 2011

Guest Blogger - The Gunny Sack - Horchow Knock-off Flower Petal Pillow


Hello Everyone, my name is Tonia and you can find me over at:


The Gunny Sack.

Congratulations to Michelle and her family on the birth of their darling new baby Remington!! I am so thrilled to be a guest on Someday Crafts while Michelle is enjoying time with her family.


I am a mom to three beautiful children and have been married for 16 years to my wonderful husband, Brian.


I want to invite you over to The Gunny Sack where I post crafty tutorials (Wire Memo Board), sewing tutorials (Sunglasses Case), fun stuff for the youngsters (yarn bowl) and recipes (Chocolate Chip Cookie Cake). But today I will share a new tutorial with you:


Knockoff Delancey Felt Petal Pillow from Horchow


Horchow sells this pillow for $145.00! I thought it was beautiful but unaffordable so I decided to make a knockoff and share the tutorial with you!

A free printable pattern for the flower pieces can be downloaded here.


To make the petals, I cut 1 inch wide strips of felt, cut the long strip into pieces slightly bigger than the petal pattern piece and then cut out the petals. I did not count how many pieces I needed, but it is a big stack! You can cut more as you go!


Lay the petals around the circle and sew them on. Make 4 layers of petals this way.


Sew a few stitches by hand to give the top petals shape and attach them to the center of the flower by hand stitching it.


Now, for the pillow, cut 1-14x14 inch square and 2-9x14 inch rectangles of the felt. I also cut 1-14x14 inch square and 2-9x14 inch rectangles of lace to add some texture to the pillow.


Stack a 9x14 inch felt piece and a lace piece and hem one of the 14 inch sides. Then, do the same with the other 9x14 inch pieces.


Now layer felt, lace, lace, felt and overlap the 2 back pieces as shown in the picture above and pin it in place. Then, sew around the outside of the fabric pieces and turn the pillow cover right-side-out.


1. Hot glue flower bases on pillow, close to each other so petals can overlap.


2. There are 4 open spaces in the center of the pillow between the flowers.


3. Cut out more of the top petals and sew 2 of the together.


4. Hot glue the top petal pairs into the 4 spaces.


Stuff pillow with your choice of filling or a pillow form.


Thanks for checking out my tutorial and I hope to see you soon at


THANKS, TONIA! That is one of the most beautiful pillows I have EVER SEEN! Your knock-off looks just like the real thing! I'm amazed! Thanks for sharing.


Visit The Gunny Sack today to get more awesome ideas to improve your life and home!

Related Posts Plugin for WordPress, Blogger...